
Nextcloud is free software for storing data on your own server. When using a client, the server is automatically synchronized with a local directory. This allows access to a consistent database from multiple computers as well as via a web interface. It is a self-hosted alternative to Google Drive.
In order to install Nextcloud as a Docker container, the Community Applications plugin is required. You can find out how to install it beforehand if you have not set it up yet.
Install the MariaDB database
Nextcloud requires a database. For this, it is best to use the MariaDB Docker from “Linuxserver”. Click on the Install button and the following window appears:
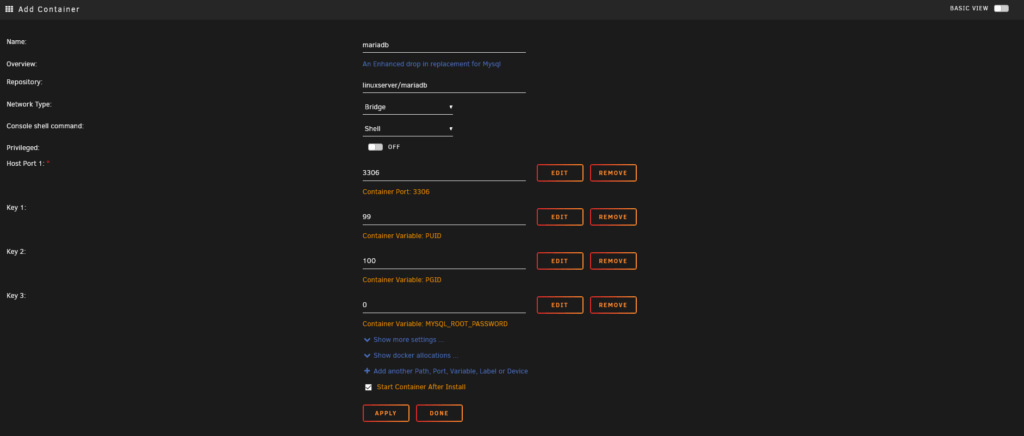
The port as well as the PUID and PGID can be left at the default. However, you should always store a root password. Keep it safe, because it is always needed when you want to install a Docker container that requires a MariaDB database. Once the MariaDB Docker is installed, you can continue with Nextcloud.
Install Nextcloud on Unraid
Nextcloud also uses the Docker from “Linuxserver”. Under the settings, the path to the directory where Nextcloud should store the data can be entered as “Host Path 2”. Again, you can leave the other settings as they are. If you had to change them, you would know it.
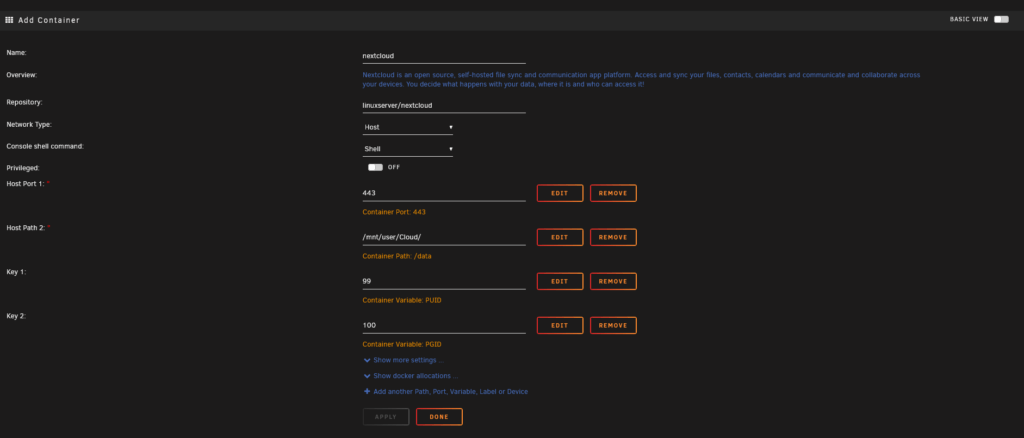
Once the installation is complete, you can open the web interface by entering your server IP followed by port 443 in the browser. Example: https://192.168.178.57:443
There you should see the following page:
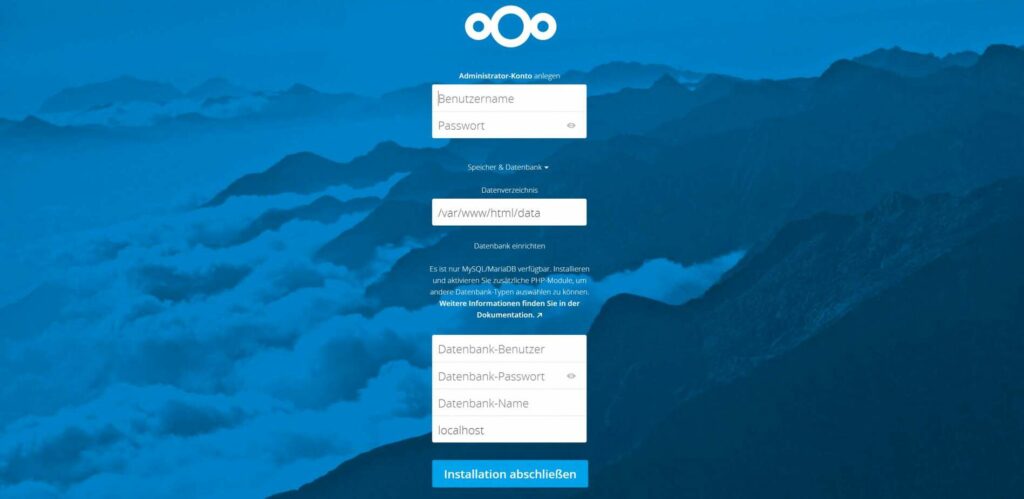
Under “Create administrator account”, who would have thought it, the administrator account is created. The data directory can be left at the default value; where the data is stored was already defined during the Docker installation.
Under Database, enter root as the user and the password you just set. The database name can be chosen freely. It is best to simply use “nextcloud”. Under host, you must specify the MariaDB Docker, so localhost or the IP of your server followed by port 3306.
Example: localhost:3306
With a click on Finish installation, Nextcloud is already installed. Now you can also access Nextcloud locally. But a cloud service that only works locally is not really practical. Therefore, here are the instructions on how to make your local Nextcloud installation available worldwide.
For this, the Nginx Proxy Manager is required. If you have not installed it yet, set it up first so you can forward requests to the Nextcloud Docker.
If you do not have a static IP on your Internet connection but a dynamic IP, as is usual for normal Internet connections, you also need a dynamic DNS service such as DuckDNS. Of course, you can also use your own domain with a dynamic IP address.
Once the preparations shown in the two linked tutorials are complete, you still need to set up port sharing for Nextcloud.
Create port shares for Nextcloud
In order to make the Nextcloud installation accessible from outside your network, a port share must be created as with the Nginx Proxy Manager. Two TCP ports can be shared. Although you can omit port 80, encrypted connections only use port 443. How to set up port shares depends on your specific router.
With the Nginx Proxy Manager, you forward the requests to the Nextcloud Docker. There you can also create a Let’s Encrypt SSL certificate to encrypt the connection.
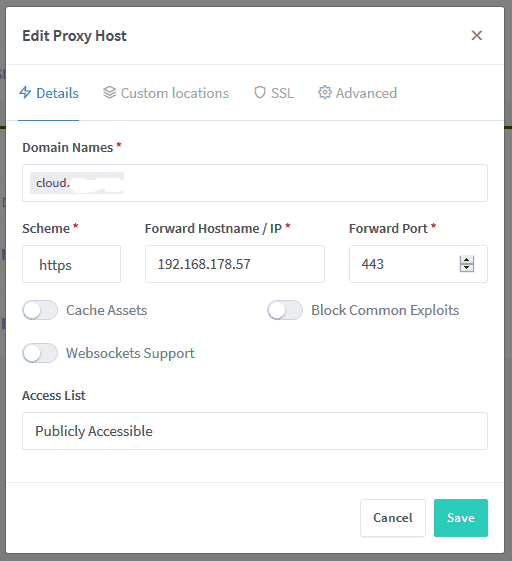
In the web interface of the Nginx Proxy Manager, you create a new proxy host. There you enter the domain or the DuckDNS domain. Then the IP and the port of the server, as shown in the picture above. Under “Scheme” you have to enter “https”.
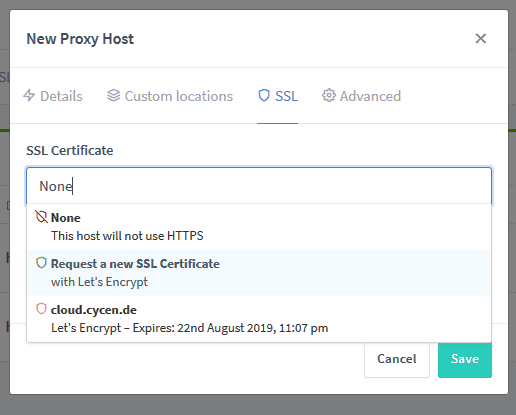
Under the tab “SSL” you can request an SSL certificate to encrypt the connection.
Make Nextcloud available with the Nginx Proxy Manager
Nextcloud has a special security feature. That is why you will see the following error page when you try to access Nextcloud now:
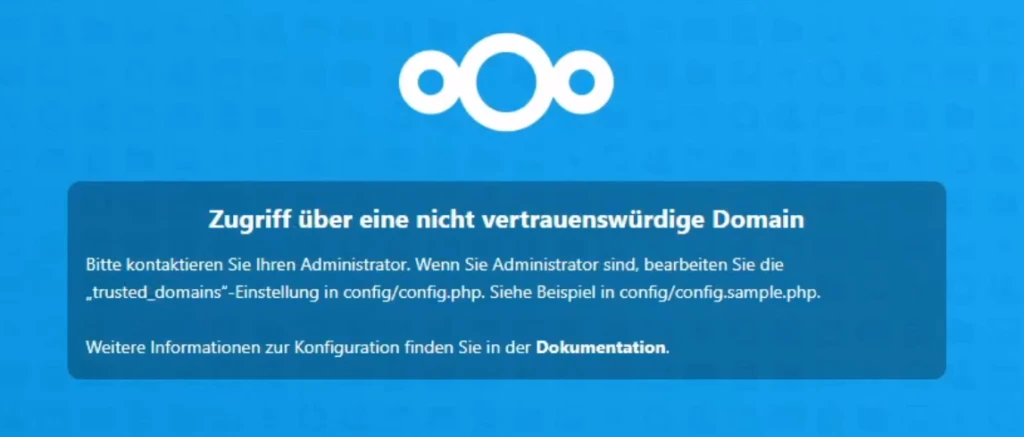
To fix this you have to edit the Nextcloud config. To do this you need to connect to your Unraid server with an FTP client. Now open the config under this path: appdata/nextcloud/www/nextcloud/config/config.php and open it with a text editor of your choice. It should look something like this:
.
.
.
   'trusted_domains' =>
   array (
     0 => '192.168.178.39:443',
   ),
   'dbtype' => 'mysql',
   'version' => '20.0.6.1',
   'overwrite.cli.url' => 'http://192.168.178.39:443',
   'dbname' => 'nextcloud',
.
.
.
The irrelevant lines above and below the entry have been omitted. Now you have to add three lines so the block looks like this:
.
.
.
   'trusted_domains' =>
   array (
     0 => '192.168.178.39:443',
     1 => 'Subdomain.duckdns.org',
   ),
   'dbtype' => 'mysql',
   'version' => '20.0.6.1',
   'overwrite.cli.url' => 'http://192.168.178.39:443',
   'overwritehost' => 'Subdomain.duckdns.org',
   'overwriteprotocol' => 'https',
   'dbname' => 'nextcloud',
.
.
.
The domain / subdomain must be specified twice and the “https” scheme once. Save the config, then you can already access your Nextcloud from outside.